
Bluestacks does well to provide an intuitive and powerful platform for playing Android mobile games on any desktop PC.
Still, it is, unfortunately, the occasional victim of a troublesome mistake, when the program fails to launch.
Bluestacks gets stuck in a loop with a “Could not start the Engine. You can try restarting the Engine or your PC” message endlessly showing upon launch with no fix in sight — frustrating to say the least.
In this guide, we cover a handful of fixes to resolve this issue for good and improve Bluestacks’ performance overall.
Let’s dive right in.
Table of ContentsShow
Change Bluestacks Graphics Mode
Here’s a quick and easy fix that works for most users. As a gaming emulator, Bluestacks is wholly reliant on the graphical output to do its thing, so when it isn’t behaving well, switching up the graphics mode can do wonders to inject new life. Here, we’re shifting from OpenGL to DirectX. Here are the steps to follow:
- Open up Bluestacks. Ignore the “engine won’t start” error message.
- Click on the cogwheel icon located in the top right corner next to the minimize and close buttons.

- Select “Settings” from the drop-down menu that appears.
- In the Settings window, click on “Engine” from the options running vertically down the left-hand of the screen.
- Under “Choose graphics mode” tick the “DirectX” option on the right rather than “OpenGL.”

- A “Checking DirectX compatibility” message will show up briefly, followed by a message saying “Restart Bluestacks to boot in DirectX.”
- Click on the blue “Restart Now” button that appears below.
- Bluestacks will boot up and should load up without any issues.
In a similar vein, under the “Engine” settings, check to see what the RAM allocation is set to in the “CPU and RAM allocation” section. Move the slider up to the “Recommended memory” value just above if it isn’t already set by default.
We wouldn’t recommend toying with the “CPU cores” setting unless the error persists. If this is the case, what you want to do is go ahead and raise the number of cores incrementally one at a time to see if the change resolves the issue.
Temporarily Disable Antivirus Software
Bluestacks has a love-hate relationship with antivirus software, and the latter can cause all types of problems that hinder the program’s ability to open up correctly. The steps to temporarily disable the antivirus will depend on what program and version you’re using.
Refer to your respective program’s support page or official documentation for detailed steps as these can differ significantly. For the sake of example, we are using Avast to demonstrate how to disable antivirus temporarily.
- To begin, start by right-clicking on the Avast icon located in the Windows system tray.
- In the contextual drop-down menu, move your mouse to “Avast shields control.”

- In the expanded menu that appears, select one of the “Disable” options. We don’t recommend choosing “Disable permanently” as this leaves the PC vulnerable to threats and attacks. Opt instead for “Disable for 10 minutes” or “Disable for 1 hour,” allowing you enough time to see if this has resolved the Bluestacks issue.
- When prompted, hit “Yes” on the “Do you want to continue?” popup.
- Launch Bluestacks.
Another antivirus fix that has worked for some users is to disable any inbuilt virtualization settings. Once again, we focus on Avast. As with the disable shields fix above, remember to turn the option back on when you’ve finished using Bluestacks to ensure your PC is protected.
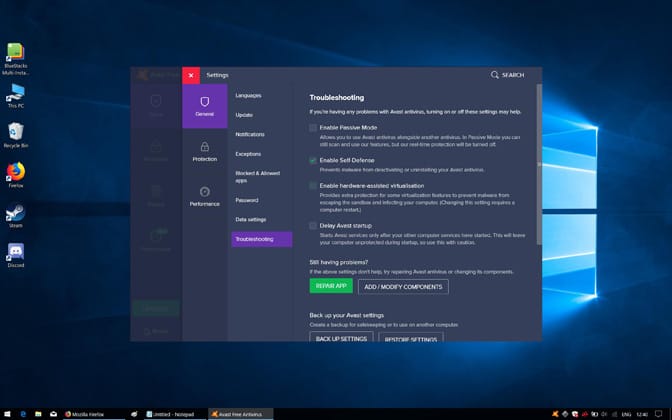
- First, right-click on the Avast icon in the Windows system tray.
- In the drop-down menu, click on “Open Avast user interface.”
- In the Avast window, click on the “Menu” button located in the top right and click on “Settings” from the drop-down menu.
- Click on “Troubleshooting” among the vertically listed subcategories on the left-hand side on the Settings window.
- Locate and untick the “Enable hardware-assisted virtualization” option.
- Restart the PC when prompted.
- Launch Bluestacks.
As an added benefit, Bluestacks should run a lot smoother than previously thanks to this tweak.
Uninstall & Reinstall Bluestacks
If the above solutions all fail to resolve the problem, then a complete uninstall/reinstall should fix the issue. The idea is to remove any potential installation or update bugs that may be hindering Bluestacks from loading up correctly. Here’s how to go about doing this:
- Close Bluestacks and right-click on the Bluestacks icon in the system tray and click on “Quit.” If this fails, hit Ctrl+Alt+Del, then “Task Manager,” select “Bluestacks” from the services list and click on “End Task.”
- Right-click on the Windows Start menu and select “Run” from the contextual list that pops up.
- Type “%temp%” into the search field and press “OK.”

- In the Windows Explorer window that appears, select all the files, then right-click and choose “Delete.” These files are temporary and therefore no longer of any use, so they can be safely deleted.
- Download the Bluestacks Uninstall from the Bluestacks website here. The uninstall utility will remove all traces of Bluestacks, making way for a fresh install.
- Once downloaded, double click on the BSTCleaner_All.exe executable.
- When prompted with the “Do you want to allow this app to make changes to your device?,” click “Yes.”

- The uninstall wizard will remove Bluestacks. Allow up to a few minutes for this to be complete. You’ll know it’s done when the “Process has been finished.” message shows up on the screen.

- Visit the Bluestacks website and download the latest version of the software here by clicking on the large green “Download Bluestacks” button.

- When downloaded, double click on the “BlueStacks-Installer_” executable.
- When prompted with the Windows “Do you want to allow this app to make changes to your device?,” click “Yes.”

- In the install wizard, click “Install Now.”

- When the install is finished, click on “Complete.”
- Bluestacks will launch automatically and go through the first boot process, which should take no more than a few minutes at worst.
- Remember to switch the graphics mode to DirectX as detailed above.


